I decided to give the Book Designer Gadget a major overhaul, and I've created a new "Visual Book Designer" tool that should be even easier to use and more powerful. I would like to talk about that tool a little bit here, because I feel like it's a great prototype for the kinds of tools that Wikibooks is going to need in the future to help attract a new generation of technically un-savvy authors. This new gadget is completely visual, and it doesn't require any technical expertise to use.
To install and use the gadget, there are three easy steps:
- Create an account on en.wikibooks
- Go to [[Special:Preferences]], and on the gadgets tab check the box "Whiteknight's Book Creator". This will install all my tools, including the Visual Book Designer automatically. No need to edit your monobook.js file at all, the gadgets extension does all the work for you.

- Go to the form at [[User:Whiteknight/Visual Book Designer]] to see and interact with the gadget.

Everything you see here can be clicked on, and many options can be changed. If we click on the title "New Book", we can change it:

 The rename function performs a quick AJAX page request to determine whether the page exists or not. You are not allowed to create a new book with the same title as an existing book.
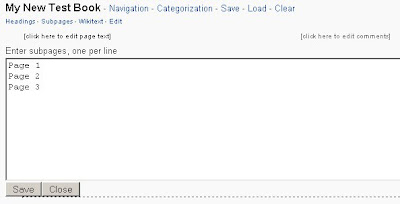
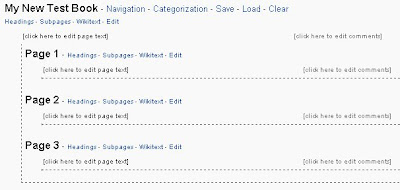
The small links below the book title, "Headings" and "Subpages" are the most important. These are the buttons that allow you to construct your outline. Clicking either "Headings" or "Subpages" will open a box where you can list the names of page headings or subpages, respectively. I'll demonstrate with subpages since they are the most important. Click the "Subpages" button, and enter a list of pages that should be added to your table of contents, one per line. Click save when you are done adding subpages to your outline:


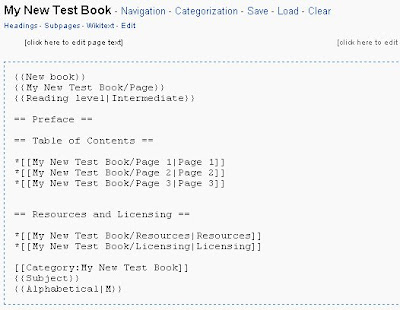
You will notice that on each subpage, we have the option to add sub-subpages, and more headings. In this way, you can easily create books using a variety of hierarchies, like "Book/Page", "Book/Chapter/Page", "Book/Chapter/Subchapter/Page", etc. Astute observers will notice little links for "Wikitext" under each page in our outline. Clicking on the "Wikitext" link will automatically generate the necessary wikitext to create that page:
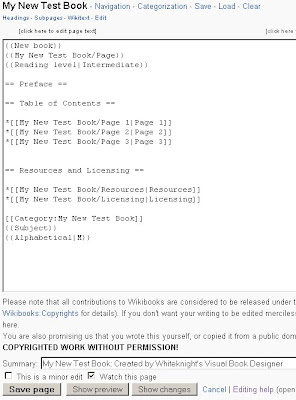
 Notice that it adds all the necessary templates for organization, it adds necessary categories, and it creates links to all your subpages. From here, you can copy+paste the text to your page. Very astute observers will also have noticed a small link that says "Edit" under the subpages as well. On wiki, when I show you a button or a link that says "Edit", what comes to mind? Clicking on that link will open an embedded edit window, right here in the middle of the gadget, where you can edit the page in question automatically:
When you open the edit window, all the text and a handy summary are filled in for you. You can save or preview your edit just like you can in a normal edit window (because it is a normal edit window). You can do this for each page in your book too, not just the main page.
There are many more options that I won't discuss in detail here, but I hope that you get an idea of how useful a tool this is for new book authors. You can layout and design a book, following Wikibooks community best practices, without having to write a single character of wikitext. Here is a quick list of additional features:
- You can save a partially completed outline to a page on the wiki, and load it into the gadget again later.
- You can add your book to one or more subject categories by selecting from a convenient list. You don't need to know the exact name of the category, or the location of the bookshelf, or anything to make this work.

- You can create the necessary navigation templates, but picking from one of a small set of predefined alternatives. Once the template is created, you can modify it to your heart's content.
- You can add text to each page and each heading by clicking where it says "[Click here to edit page text]". The editor isn't as large as the regular page editor, and it doesnt have any of the normal editing buttons, but you can write a short blurb to get yourself started.
- You can add comments to the outline by clicking where it says "[Click here to edit comments]". Comments are visible to you on the outline, for making reminders and short notes, but are not visible in the book when you create it.

No comments:
Post a Comment